|
1 Neuroanatomy
1.1 Perfusion for Methylene Blue Stain
and Fixation of Brain in Situ
The purpose of these procedures is to perfuse the brain with
methylene blue stain and paraformaldehyde fixative for
blockface photography that reveals structural boundaries with
a degree of detail equal to that obtained by photographing a
conventional glass mounted section stained for Nissl
substance, e.g., by cresyl violet stain. In brain atlas
development we use this technique to map the boundaries of
substructures from stained sections undistorted by cutting,
floating and mounting sections on glass slides.
Using the techniques described in this section we obtain
blockface sections as shown in Figs. 1 and 2; compare to
blockface image of unstained brain in Fig. 3.
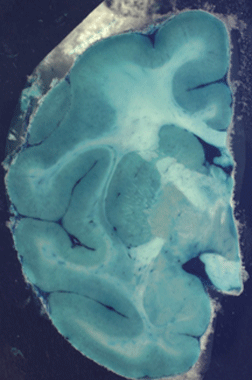
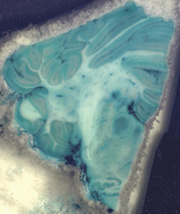
Figure 1: Two blockface photographs taken
during sectioning of a macaque brain that was perfused with
methylene blue and molybdate to fix the stain and with
paraformaldehyde to fix the tissue. The brain was dissected
and frozen immediately after perfusion and sectioned on a
freezing microtome 5 hours later.
While cortical and nuclear boundaries are readily visualized
immediately following perfusion (Fig. 1), they become more
distinct if the specimen is immersion fixed in
paraformaldehyde for a longer period of time. Leaving it in
the fixative for an extended time appears to clear stain from
the white matter without reducing the stain in gray matter.
The brain shown in Fig. 2 was perfused with methylene blue,
immersion fixed for 6 months and cryoprotected in successively
more concentrated solutions of sucrose over a period of two
weeks before it was sectioned.
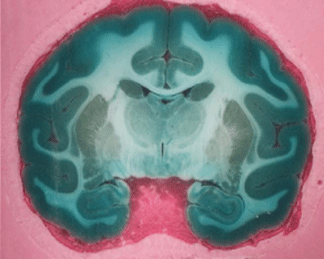
Figure 2a: Blockface photograph of a
macaque brain sectioned 6 months after perfusion staining with
methylene blue followed by perfusion and immersion fixation
with paraformaldehyde.
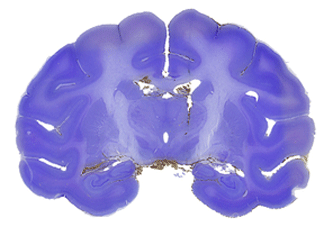
Figure 2b: Section from about the same
level from a different animal that was cut, mounted and
stained for Nissl substance with cresyl violet stain for
comparison with the perfusion stained blockface in Fig.
2a.
1.1.1
Solutions for Methylene Blue Perfusion Protocol
Note that recipes are in amounts for total body perfusion and
some are for two macaques, each with a body weight about
3kg.
Paraformaldehyde Solution (4% paraformaldehyde/0.1M
phosphate buffer)
Make
8L total for 2 animals. This may be made up to 48 hours before
use
First make buffer stock for 4L:
Dissolve pre-weighed sodium phosphate (0.4M PB Stock in
green-lidded plastic cup) through
funnel into 2L flask
Rinse through with 960ml distilled water.
Low heat and stirring.
Second, make fixative 2L at a time:
Place 500ml buffer stock and 500ml distilled water in a 2L
flask with a stir bar.
Add 80g paraformaldehyde (2 blue-top tubes of preweighted
paraformaldehyde)
Add 1L distilled water.
Put small ehrlenmeyer flask upside down in neck to reduce
evaporation loss.
Heat with stirring in a chemical fume hood until clear
checking temperature periodically.
Turn heat off when it reaches 60 degrees centigrade and allow
to sit until clear. (This should
provide sufficient heat to disassociate the paraformaldehyde.
If temperature exceeds 65
degrees centigrade, take flask off of heater.)
When solution is clear, take it off heater and cool to room
temperature in a bucket of cold
water.
Rinse the first flask and filter the solution through No. 1
Whatman filter paper.
Use at room temperature.
Methylene Blue Solution: (1% methylene blue in 0.9%
NaCl)
Make
1L (500ml/animal for two animals)
Warm
1L 0.9% NaCl to about 40 degrees centigrade (do not exceed 40
degrees)
Add
10g methylene blue (preweighed 5mg/vial)
Allow
to cool to room temperature while stirring
Filter
through No. 1 filter paper
Avoiding
bubbles, transfer to 1L source bottle for perfusion
Molybdate Solution: (5% aqueous ammonium
molybdate)
Make
1L (500ml/animal)
Add
2 vials of 25g ammonium molybdate (preweighed in blue topped
vials) to 1L distilled water.
Dissolve
with heat and stirring.
Filter
through No. 1 filter paper before use.
Saline H/P Solution: (0.9% NaCl, 0.05% papaverine,
1000U/L sodium heparin)
Make
2L/animal immediately before use
Add
1g papaverine (1 green-topped preweighed vial) to about 100ml
saline in small Ehrlenmeyer
flask.
Dissolve
with heat and stirring.
Heat
1.9L saline to 37-40 degrees centigrade.
Add
papaverine solution to saline as it is filtering through No. 1
filter paper.
Maintain
at 37-40 degrees centigrade until use.
Just
before use, add 2ml sodium heparin.
1.1.2
Conventional Transcardiac Perfusion
Introduction of fluids by placement of a catheter through the
heart into the ascending aorta perfuses the entire body. To
conserve perfusate, one can restrict perfusion to the upper
limbs, upper thorax and head by clamping the descending aorta
in the thorax.
Instruments and
Materials
Surgical shirt, pants, gown, hat, mask and goggles
Surgical gloves
Ketamine
Pentobarbital
3ml syringes for ketamine and pentobarbital (2)
Needles for ketamine intramuscular
Intravenous kit or butterfly needle for pentobarbital
Adhesive tape
Scalpel handle (#10)
Scalpel handle (#11)
Scalpel blades (#10)
Scalpel blades (#11)
Cradle and drainage
Fan or fume hood
Bone shears
Thoracic retractor
Toothed forceps for pericardium
Metzenbaum blunt scissors for pericardium
Aortic clamp or large hemostat (optional to clamp aorta)
Babcock or equivalent cardiac clamp
Conical nylon cannula and tubing to pump
Pump, tubing, and valves
Hemostats to clamp tubing
Saline/heparin/papaverine (Saline H/P) solution (2L)
Methylene blue solution (500ml)
Molybdate solution (500ml)
Paraformaldehyde solution (4L)
1L source jar for methylene blue
2L source jar fo, molybdate, and paraformaldehyde
Periosteal elevator
Rongeurs, medium size
Rongeurs, large size
1/2L plastic jar for specimen
Procedure
Change to surgical attire
Ketamine sedation (10mg/kg = 0.1ml/kg IM)
Place intravenous (IV) catheter or needle in saphenous
vein
Pentobarbital anesthesia IV to surgical level (.5ml
(25mg/kg)/kg; 1/3 of dose at 3min intervals)
Saline H/P solution (2.5ml/kg slowly by IV)
Incision from sternal notch to xyphoid process (#10
scalpel)
Midline thoracotomy by bone shears (midsternal to avoid
vasculature)
Palpate pulse of descending thoracic aorta against spine and
clamp it (optional)
Incise pericardium: grasp and lift with toothed forceps;
horizontal incision followed by incisions
down and up (forceps and blunt scissors)
Start pump at lowest setting that produces a flow (setting 1
on our pump)
Incise left ventricle close to apex (blunt scissors; to locate
site of cardiac incision: rotate heart about 3/8 turn
counterclockwise; grasp apex of heart with toothed forceps;
make 5mm horizontal incision about 10 mm from apex near
medial boundary of left ventricle (septum); if no impressive
spurt, cut a little more... when you are in the ventricle the
spurt is pronounced; insert cannula until you can confirm
visually that it is in the aorta (the aorta is on the animal's
right, pulmonary vein on its left and not as
muscular as the aorta.)
Insert conical cannula through ventricle into aorta: identify
aorta first and feel tip of connector as it
enters
Clamp cannula in place (cardiac clamp)
Clip right atrium to allow return flow (scissors)
Incise right flank and diaphragm to facilitate flow of fluids
from atrium away from thorax
Start pump (setting ~2.0); if lungs clear very fast and
pressure is very low the connector is probably
either in the right ventricle pumping through the lungs or in
the mitral valve of the left ventricle
pumping in reverse through the lungs; reduce pump speed and
reset into aorta; if pressure is
much above 100mmHg and the tongue and mucous membranes start
to clear you are probably
in the aorta; adjust pump speed to keep it at about 100mmHg.
When clear saline is flowing from the right atrium or 1000ml
have passed, slow pump, clamp saline
tube, unclamp methylene blue tube, deal with any bubbles and
set pump speed back to ~2
When almost all of the methylene blue has passed, slow pump
speed; clamp methylene blue tubing;
unclamp saline; deal with bubbles; and reset pump speed to
~2
When the tubing is clear of methylene blue, slow pump, clamp
tubing near outlet from saline bottle; pour out remaining
saline and pour 500ml molybdate into the bottle; bleed off
bubbles; return pump setting to ~2
When molybdate has almost emptied, fill the same bottle with
paraformaldehyde to the 2L level (no need to remove remaining
molybdate)
When most of the paraformaldehyde has passed, stop the
pump; remove all clamps and the cardiac connector
Perform cephalectomy (#22 scalpel and bone shears)
Dissect scalp and cranial musculature (scalpel, periosteal
elevator)
Dissect mandible, soft oral tissues and orbital contents
Open as much of cranium as possible without disturbing the
external auditory canals and inferior orbital ridges, which
will be needed for stereotaxy; also leave enough of the
cranial vault to give something to hold later when dissecting
the bone around the flocculus; include in removal the area
likely to be used for registration rods (5mm anterior to
external auditory canals); leave dura intact; in this animal,
occipital bone removed starting from foramen magnum; forward
cranium entered laterally ~3mm rostral to external auditory
canals (large rongeurs); temporal bones and lateral parts of
frontal bones removed leaving a peninsula of frontal bone
attached to brows.
Make a nest of cling wrap in jar of paraformaldehyde for
transport; place specimen there; add more cling wrap; close
with jar lid tightly; wrap tightly 3 or more times with
parafilm; apply tape to jar; write animal ID, date, and Bowden
on the tape;
When time for transport: place in black plastic bag and tie
it; place in a second black bag and tie it;
place in +4degree centigrade refrigerator until time for
transport.
1.1.3 Transcarotid
Perfusion
In cases requiring perfusion of the brain without exposure of
the remainder of the body to perfusate, one can perfuse
through the carotid arteries. This has the advantage that one
can perfuse the brain with fixative and still obtain tissues
from other organs without exposing them to fixation. Compared
with total body perfusion, it has the theoretical disadvantage
that, if the circle of Willis is not patent, parts of the
brain served by the vertebral artery may be less well fixed
than those served by the carotid arteries. We have not found
this to be a problem in the five or more cases where we have
applied the approach.
Instruments and
Materials
30cc syringes (4) with perfusate to clear the vessels of
blood: 0.9% NaCl; to prevent clotting:
heparin (1000U/L); to prevent reflex arterial constriction:
papaverine-HCl (.05%)
Bucket for warm water in which to hold syringes at
~40oC
Thermometer to measure temperature of water in bucket
Animal Y-tubing (single tube from pump to Y-connector that
splits flow to two tubes connect to
angiocath needles to be implanted in right and left carotid
arteries)
#14 angiocath needles (3) with Luer lock hubs (2); smaller
angiocaths (3) in case #14 too large for
animals smaller than macaque
Polypads to absorb fluids
Container for specimen
Opaque bag for specimen container
Parafilm to cover bottle openings
Pump calibration table
Clipboard, protocol, paper, pencil, marker, tape
Surgical shirt, pants, gown and hat
Surgical gloves
Mask
Glasses
Ketamine
Pentobarbital
3 cc syringes (2) and needle (about 21 gauge)
Intravenous catheter
Clippers
Scalpels (2) (#10 blade)
Scalpel (#11 blade)
Toothed forceps
Non-toothed forceps
Retractor
Straight clamps (4)
Right angle clamp; 7”, narrow tip
Towel clip
Blunt dissection scissors (6in, ~5cm blade, narrow)
Silk sutures (4 of #2 silk about 20cm in length)
Bone shears
Blunt forceps: narrow tip, non-toothed
Bull-dog clamp (~1”; Miltex)
Catheter introducer
Silastic sutures for vessel retraction(~20cm)
Saline/heparin/papaverine (Saline H/P) solution (2L)
Methylene blue solution (500ml)
Molybdate solution (500ml)
Paraformaldehyde solution (4L)
1L source jar for methylene blue
2L source jar for Saline H/P, molybdate, and
paraformaldehyde
Periosteal elevator
Rongeurs, medium size
Rongeurs, large size
1/2L plastic jar for specimen
Cotton balls
Procedure
Lay out instruments: small scissors, small forceps, extra
clamps, chest retractor, silastic vessel retraction
strings, syringes of heparinized saline, angiocaths, animal
Y-tubing.
Sedate animal with ketamine (10mg/kg IM)
Clip hair from anterior neck
Place indwelling catheter in saphenous or femoral vein
Anesthetize to surgical level with pentobarbital (.5ml
(25mg/kg)/kg; 1/3 of dose at 3min intervals)
Restrain head in extension
Make a longitudinal incision from 2-5 cm behind mentum to
sternal notch (scalpel with #10 blade)
Dissect between the sternohyoid and sternomastoid muscles to
expose the carotid vascular compartments bilaterally
(dissection scissors, blunt forceps; straight clamps and/or
retractor) this may require section of the omohyoid
muscle.
Anchor the Y-tubing with the saline syringe to the abdomen
(towel clip)
Dissect the common carotid artery in each compartment to
separate it from the internal jugular vein and vagus nerve for
a length of 2-3cm;
dissect the artery from the vein for 2-3cm;
repeat on the other side.
Dissect an opening under the artery; work the angle clamp
through it and drag back a silastic suture so that it runs
under and perpendicular to the artery; use it to elevate the
artery and use the dissection scissors to complete freeing it
from its attachments in the neurovascular compartment; place
two silk sutures around the artery, make a half-tie in each;
place one at the cranial end and the other to the cardiac end
of the exposed section of artery; remove the silastic vessel
retractor; repeat on the other side.
Place the silastic vessel retractor around the artery at the
cranial end; wrap it around twice so that when it is retracted
it stops blood flow; triple-tie off the artery at the cardiac
end using the silk suture there;,
with an assistant (or clamp to skin) occluding the cranial end
by traction on the silastic vessel retractor, pinch the artery
gently with the forceps about 3mm in the cranial direction
from the silk tie that is occluding the artery; at the tip of
the forceps, on the cardiac side, make an incision of 10-20%
of the artery’s diameter perpendicular to the long axis of the
artery
(pointed scalpel, i.e., #11 blade).
Note the location of the bifurcation of the carotid; insert
the catheter introducer into the incision with the point in
the cranial direction; once it is in, use it to guide the
insertion of the intracath needle into the vessel;
insert the needle about 5mm and remove the introducer; advance
the intracath 2-3cm; being careful not to get the tip
within 5-10mm of the carotid bifurcation;
clamp the artery to the needle with a bull-dog clamp; triple
tie the suture at the cranial end onto the vessel about 1cm
cranial to the site of needle entry; grasp one end from each
of the silk sutures and cross-tie them to reduce the
likelihood that the needle will pull out;
remove the silastic vessel retractor; inject about 25 ml of
the saline/heparin/papaverine solution; repeat on the other
side.
Clamp carotids and jugulars on the cardiac side of the tied
off arteries; section the carotids and jugulars being careful
not to disturb the implants; perform cephalectomy by severing
the remaining soft tissues (#10 scalpels) and spinal column
(bone shears); cutaneous incisions low on neck to avoid loss
of fluid through facial vessels during perfusion; cushion head
in polypad; transfer to fume hood for perfusion.
Attach the animal Y-tubing to the pump tube being careful to
have no bubbles in the line.
Start pump (setting ~2.0 delivers 64ml/min with an open line
pressure through two 14 gauge
intracaths of 20mmHg). Clamp one limb of the Y-tubing so that
perfusate flows only through one
carotid. After two minutes unclamp the limb of the Y and clamp the other. Alternate
every two
minutes to ensure equal perfusion of both sides.
When clear saline is flowing from neck vessels or 400ml
have passed, slow pump, clamp saline tube, unclamp methylene
blue tube, deal with any bubbles and set pump speed back to
~2
When almost all of the methylene blue has passed, slow pump
speed; clamp methylene blue tubing; unclamp saline; deal with
bubbles; and reset pump speed to ~2
When the tubing is clear of methylene blue, slow pump, clamp
tubing near outlet from saline bottle; pour out remaining
saline and pour 500ml molybdate into the bottle; bleed off
bubbles; return pump setting to ~2
When molybdate has almost emptied, fill the same bottle with
paraformaldehyde to the 2L level (no need to remove remaining
molybdate)
When most of the paraformaldehyde has passed, stop the
pump; remove all clamps and the cardiac connector
Perform cephalectomy (#22 scalpel and bone shears)
Dissect scalp and cranial musculature (scalpel, periosteal
elevator)
Dissect mandible, soft oral tissues and orbital contents
Open as much of cranium as possible without disturbing the
external auditory canals and inferior orbital ridges, which
will be needed for stereotaxy; also leave enough of the
cranial vault to give something to hold later when dissecting
the bone around the flocculus; include in removal the area
likely to be used for registration rods (5mm anterior to
external auditory canals); leave dura intact; in this animal,
occipital bone removed starting from foramen magnum; forward
cranium entered laterally ~3mm rostral to external auditory
canals (large rongeurs); temporal bones and lateral parts of
frontal bones removed leaving a peninsula of frontal bone
attached to brows.
Make a nest of cotton balls in jar of paraformaldehyde for
transport; place specimen there; add more cotton balls; close
with jar lid tightly; wrap tightly 3 or more times with
parafilm; apply tape to jar; write animal ID, date, and
investigator’s name on the tape;
When time for transport: place in black plastic bag and tie
it; place in a second black bag and tie it;
place in +4degree centigrade refrigerator until time for
transport.
1.1.4
Alternative Techniques Tested
The cut surface of the fresh unperfused brain (not
shown) shows remarkable detail and may be useful in
applications where one can use the Vibratome to section the
brain.
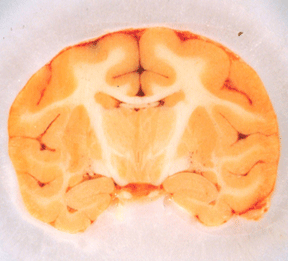
Figure 3: Blockface photograph of an
unperfused, frozen macaque brain (shown here) reveals
less detail than blockface of fresh unperfused brain (not
shown) or the frozen brain perfused with methylene blue (Figs.
1,2) potassium dichromate (Figs. 4,5).
Perfusion staining with methylene blue
without molybdate produced a specimen in which the
color was very unstable. The surface of a block showed little
gray-white contrast when first cut, then became gradually
darker blue as it stood on the microtome stage exposed to air
and warming. As one took sections into the block the
coloration varied from absent to dark depending on the time
interval between cuts.
Perfusion staining with methylene blue following perfusion
with heparinized saline lacking papaverine
produced a specimen in which much of the brain was well
stained, but isolated areas were totally unstained. We believe
that without the papaverine some arterioles constrict and
block the circulation of perfusate into the vascular beds that
they would otherwise supply.
Perfusion staining of one baboon specimen with cresyl violet failed to reveal more
detail than perfusion with no stain. Cresyl violet failed to
pass the blood brain barrier. The vasculature was nicely
defined, so perfusion with this stain might produce a specimen
suitable for mapping vessels, but it was of no use for
defining nuclear boundaries.
Perfusion staining of one longtailed macaque specimen with
potassium dichromate
following, as nearly as possible, the method used by Clarke,
R. and E. Henderson ("Investigation of the Central Nervous
System." The Johns Hopkins Hospital Reports Special
Volume: 163-172, 1920) provided good nuclear detail (Figs. 4,
5). The gray-white contrast was not as pronounced as with
methylene blue, but the method is simpler (fewer steps) and
less time-consuming (no need to wait weeks or months for white
matter to clear). Thus, it may be a preferable technique for
some purposes.

Figure 4: Blockface photograph of block
from a macaque brain perfused with 2% potassium dichromate and
5% formalin in 0.9% NaCl and immersion fixed in the same
solution for 72 hours.
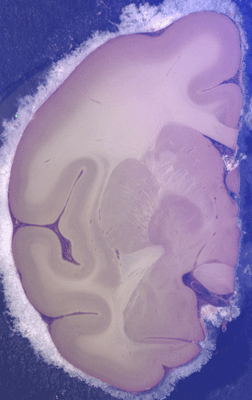
Figure 5: Blockface photograph of a coronal
section about 1mm deep to the surface of the block of macaque
brain perfused and immersed as described in legend to Fig. 4..
Gray-white boundaries, particularly between subcortical
nuclei, are more distinct than in unperfused brain (Fig. 3),
but gray-white contrast is not as pronounced as with the
methylene blue stain (Fig. 2) and some ‘white areas’, such as
internal capsule, show considerably less contrast.
Notes from Clarke and Henderson (1920; see
above) on preparation of brain for potassium dichromate stain:
"As a preliminary, the brain must be injected. A cannula is
introduced into the thoracic aorta, the right side of the
heart opened and a warm solution of 5 per cent formalin and 2
per cent potassium bichromate injected from a bottle raised
from 1 to 2 meter (p. 89). It is advisable to introduce
ear cones before the injection, as with formalin the meatus
becomes rigid" (p. 90). "Heads are kept till
sufficiently stained and hardened in formalin 5 per cent and
potassium bichromate 2 per cent. They are frozen in carbonic
acid snow...." (powdered dry ice) (p. 25).."...the brain
may be embedded in gelatine, 15 per cent, and glycerine, 5 per
cent, and frozen, or it may be embedded and cut in
celloidin...." "Brains hardened in formalin and bichromate
shrink very little." (p. 99).
| 
